Spend time together crafting these simple, yet elegant projects in an afternoon. Each has a refined look, yet are surprisingly simple—perfect for beginner to expert crafters. Use these idea starters, then add your own style.
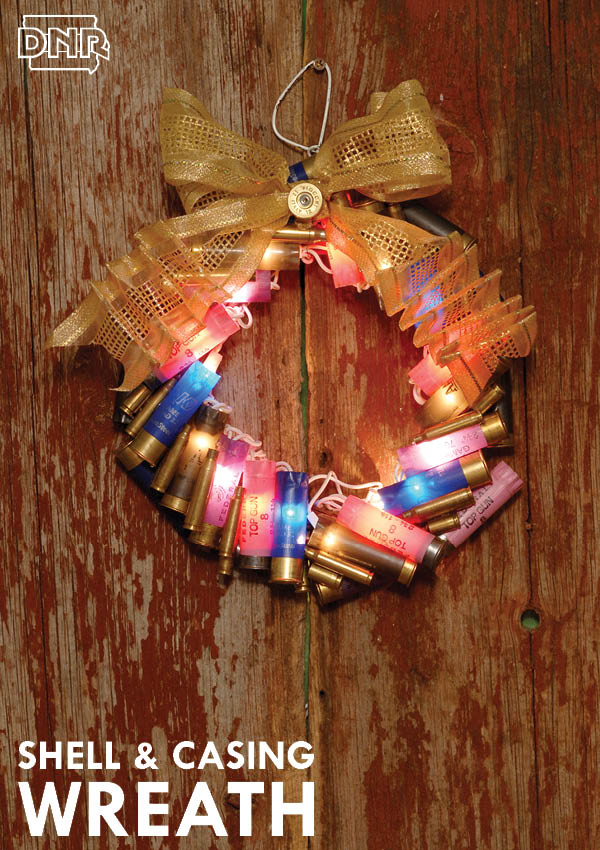
 Shell and Rifle Casing Wreath
Supplies Needed:
• One 8-inch diameter vine wreath form
• Floral wire
• Mixture of washed, spent shotgun shells and brass shell casings
• Decorative wired ribbon
• 20-count strand of lights (either battery operated or plug-in depending upon your intended location.)
With glue gun, attach shotgun shells to wreath, mimicking shell angles in the photo. Ensure 20 shell openings face the wreath interior. Glue an additional, single layer of shells around the wreath perimeter to help cover wreath. Glue varying sizes of brass shells to hide wreath form and add visual depth and appeal.
Turn wreath over to add lights. Apply hot glue to light base and insert inside a shell. Press and hold until glue has cooled. Continue until all inward-facing shells are bulbed. Secure light cord to wreath using floral wire. Wrap wire around wreath top to hang. Wire a bow to top. Cut brass section away from one shotgun shell. Glue to front center of bow for added shot of bling.
 Red and White Wreath
Supplies Needed:
• 20 spent shotgun shells—color of your choice or alternate colors (wash and dry before using to remove any residue)
• 20-count strand of lights (either battery operated or plug-in depending upon your intended location)
• 2 spools of wired ribbon (colors of your choice)—For the top decorative bow and for wrapping around wreath form
• Floral Wire
• Wire cutters
• Hot Glue Gun and glue sticks ($5-$10 at craft stores)
• Sturdy, thick wreath form. Form will be wrapped and unseen. As shown, a 10-12-inch diameter willow wreath
First:
Using hot glue and strand of lights, apply glue to base of each light and insert inside shotgun shell. Press and hold until glue cools. Continue until all shells have a light.
Second:
Wrap strand of shell lights around wreath form, considering where wreath will hang and location to power source. In this case, the plug was needed at the wreath base.
Third:
Wrap wired ribbon around the wreath to cover as much of the form and light wire as possible, yet leaving shells visible. One full standard sized spool should cover the form unless you are using a larger sized wreath.
Fourth:
• Using wired ribbon, create a bow. Secure bow to wreath with a 10-12-inch piece of floral wire.
• Using the same or separate piece of floral wire, make a loop to hang wreath.
• Add your own creative touches to make it even more decorative or keep it simple. Hang and enjoy!
 Burlap Covered Shotgun Shell Flowers
Supplies Needed:
• One 10-12-inch diameter foam floral wreath
• Spool of burlap from craft store or upcycled burlap bag—cut into 6-inch wide strips
• 5 spent and washed shotgun shells
• Heavy duty scissors
• Embellishments such as beads, buttons, gems, sequins, etc.
• Ribbon for a bow
• Floral wire to make hanger
• Hot glue gun and glue sticks ($5-$10 at craft stores)
• Needlenose pliers
Wrap the wreath form in burlap ribbon or strips. Hot glue ends of burlap to form as needed. With scissors, cut shells to form petals. Create different flower designs by varying the cuts and rounding or pointing the petal ends. With pliers, pull back each petal to the brass casing. Use pliers to curl the ends of a few petals to create variety. Apply hot glue to back of petals and attach to wreath with shell cap facing up. Create a bow and wire it to wreath. Using same wire or new piece, create a loop to hang.
Originally featured in the January/February 2014 issue of Iowa Outdoors magazine. Subscribe today online or by calling 1-800-361-8072.
Find more do-it-yourself projectson our DIY Outdoors and Upcycling boards on Pinterest, and check out our Iowa Outdoors board while you're there, too.